
The Reverse Outline
Greetings and salutations Scribblers!
Today we’re diving into a revision strategy that will really help you to tighten up your story as well as identify places where you have gaps or overlaps in your plot, world building, pacing, or characters. The reverse outline is really the multi-tool of revision. We’ll be looking at Reverse outlining: what it is, how it can help your story, and how to do it.
Okay, so let's start with the basics. You’re likely familiar with what an outline is and you probably had to do them in high school and college. You list out your main idea followed by supporting details and it would prepare you to write a comprehensive essay. Some writers create detailed outlines ahead of time to help them prepare to write, but even if you’re one of these people, a reverse outline can still be useful to make sure you’ve accomplished what you set out to do. The difference between an outline and reverse outline is that you do a reverse outline after you’ve finished writing.
You go back chapter by chapter and identify the goal of the chapter–this is like the main idea along with the details–your supporting evidence– that builds toward the goal. Doing this really lets you see the bones of your novel without all the fluff of description, character angst, and plot drama.
Completing a reverse outline of your manuscript is a big task. It’s not something you’re likely to finish in a day. It might take you a week or even a month or longer depending on your work style and the time you have to devote to the creating of it. But it’s absolutely worth doing. It’s also going to help you prepare for revision and organize how you want to approach it.
Reverse Outlines also differ from a traditional outline because they’re formatted differently. Your traditional outline is going to have Roman numbers and indents and look a bit like a list. A reverse outline works best when it’s done in a spreadsheet–which, once you master the basic functionality, are great to use for a variety of writing tasks. For tips and tricks on navigating spreadsheets, check out our video linked below. The link is in the description, or you can find it on our channel under Tutorials.
With a reverse outline, you’re not making a bulleted list as much as you're identifying specific elements of each chapter–which often overlap and can’t be ranked the way you would in a traditional outline.
Let’s take a look at a spreadsheet I use for reverse outlining.
Okay, don’t panic, there is a lot going on here! But once you take a second to assess the layout, it’s going to make a lot of sense.
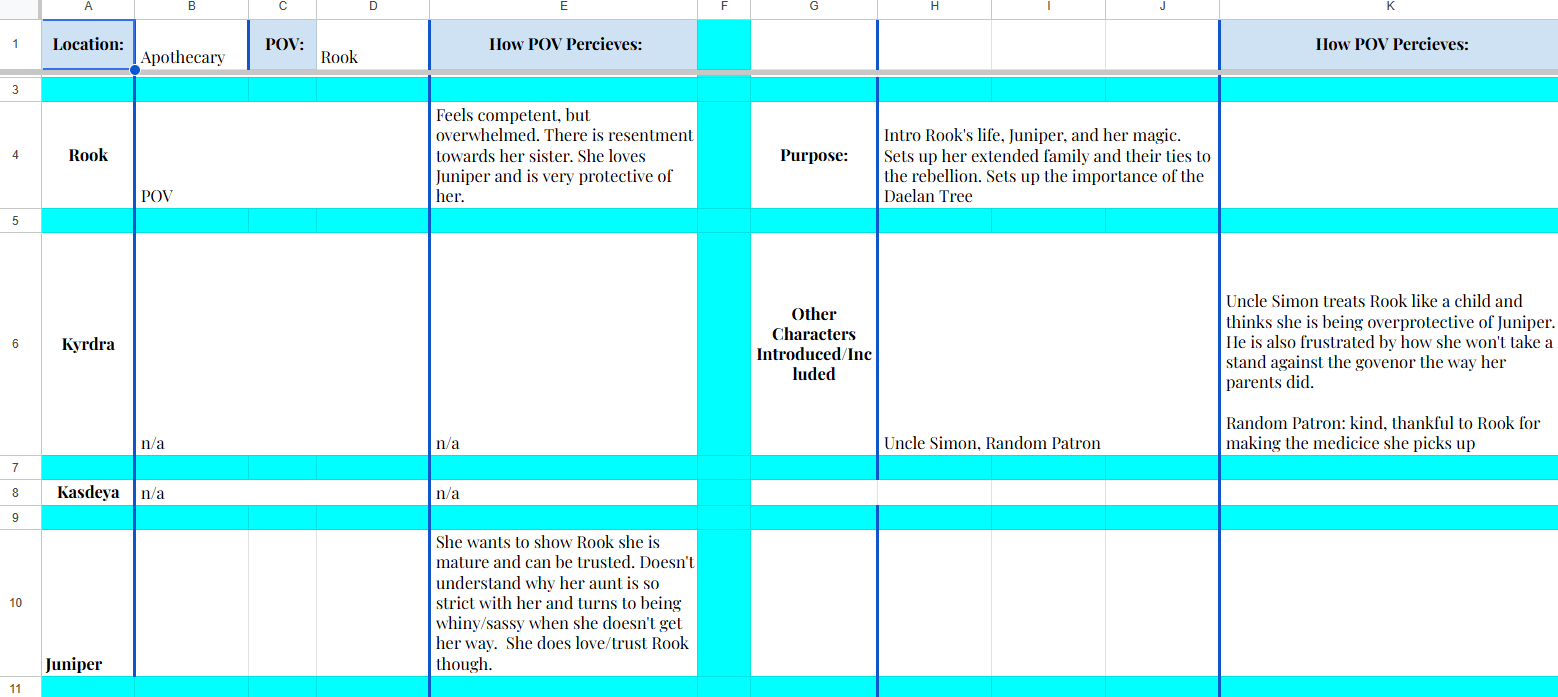
We’ll start up at the top. The first thing I do is establish where the chapter is happening and who’s POV I’m in. I tend to write in multi-pov, so this is important for me to keep track of.
From there I have my sheet divided into two aspects. I’m going to start on the left half dedicated to my characters. I have a list of my main characters going down the side. This is my default list that is created each time I duplicate the template I made for this manuscript. These will change as I go and there will be times I include minor or side characters depending on what happens in the chapter.
But this is where I examine how the characters feel about one another. So since only Rook and Juniper are in this chapter, they are the only boxes I have filled in. Rook is my POV character, so I just have a brief look at how she perceives her current situation and how she perceives any of the other main characters. Then for Juniper, it’s how she perceives Rook. This is only the second chapter of the book, so there isn’t as much to fill out, but as the rest of the characters meet each other and begin to interact, this will have a lot more filled out.
On the right side, I have details about what’s actually happening in the chapter. I like to have a summary of what’s happening, why I think the chapter needs to exist, and a list of other characters who show up or are introduced. You can put in any specific criteria you want–do what works for you!Once I identify the details, I go in and add the emotional layer–or how it’s being perceived by the POV character. This helps me to track the emotional arc of a character. And down, next to the box where I listed out other characters in the chapter, I add in how those characters are acting toward the POV character.
You’ll notice this is very stripped down. There are a lot of details I’m leaving out because I’m not focusing on that, I’m focusing on the plot and emotional beats and how they’re structured.
If you have complicated world building in your story, you might want to add in a box for keeping track of what spells or magic is used. Or when a specific piece of lore is shared with the reader. There’s really no limit to what you can include in a reverse outline. The important part is to make it useful to you.
No matter what you decide to focus on, the reverse outline is going to let you see places where you’re being redundant and you can tighten up your prose. It can help you track the emotional arc of your characters or let you see if you have plot points and events that are too similar. Or maybe it will help you see where the pacing is too fast or too slow. From a world building perspective, it can help you see where you need to include various elements so that readers can understand what’s going on or why things are happening.
Going back and creating this detailed summary of what happened in your story helps you see what you’ve written and if you’ve achieved the goal of what you set out to create.
Once you’re done with the reverse outline, take a break, give it a week or so to breathe and then go back and take a close look at it. What trends or patterns do you notice? Are you spending too much time on one event that doesn’t have a lot of impact on the plot? Are you rushing past super important things? Are your character reactions consistent or inconsisten? Do they fit with their emotional arc through the story? Did you introduce something too early or too late?
The reverse outline is a labor of love, but the insight ti gives you into your writing and your manuscript is invaluable. And every reverse outline you do will strengthen your writing for next time because you’re analyzing your own writing and identifying your strengths and weaknesses. This will affect your future drafts, revisions, and even the pre-writing outlines you’ll do because you’ve become more aware of your process.
That’s it! The Reverse Outline is a great tool to have in your writing toolbox and it can help with so many aspects of the process. If you’re interested in more revision guidance, please check out The Revision course offered by the Scribbler’s Den linked in the description. It not only provides templates in spreadsheets and a printable worksheet for a reverse outline, but it covers a lot of other very specific revision elements and strategies.
always, your mileage may vary! Take what helps and leave what doesn't! Comment below and tell us if you reverse outline and if you have any tips!